Found a problem? Check here.
Thank you to Rebecca Giles for creating this course.
Course Description: This is a drawing and painting course intended for children aged 7-12. Students don’t need to have had any art lessons before beginning this course. All the materials that are needed to complete this course are inexpensive and easy to buy.
Materials List
- paintbrushes
- watercolor paints
- crayons
- colored pencils
- markers
- No. 2 pencils
- ordinary printer paper
- a pencil sharpener
- an eraser
- scissors
- a ruler
- tape or glue
Lesson 1
Welcome to your first day of school! I wanted to give you one important reminder before you begin. Many of your lessons below have an internet link for you to click on. When you go to the different internet pages for your lessons, please DO NOT click on anything else on that page except what the directions tell you to. DO NOT click on any advertisements or games. DO NOT click on anything that takes you to a different website. Just stay focused on your lesson and then close that window and you should be right back here for the next lesson. Okay?
- If you didn’t get here through My EP Assignments, I suggest you go there and create an account.
- Using a pencil, practice drawing straight lines without a ruler. Cover a piece of paper with lines. Keep drawing straight lines for five minutes. They don’t have to be perfect, but make them as straight as you can. Make the lines go in all directions.
- Don’t erase any of the lines you draw. You can draw lines on top of each other, and you can draw on both sides of the paper. Make sure your paper is on a flat, hard surface.
- This is the end of your work for this course for your first day. You are allowed to move at your own pace (this is homeschooling), but it’s intended you complete one lesson a day.
Lesson 2
- Using a pencil, practice drawing triangles for five minutes. You already know how to draw triangles, but practice anyway.
- Make sure your paper is on a hard, flat surface. Don’t erase any of the triangles you draw.
- You can draw triangles on top of other triangles, and you can draw on both sides of the paper.
- Draw big triangles and little triangles. Here are some triangles that you can try to copy.
- Triangles are made of three straight lines. The corners of the triangles you draw should not be round. Each time you draw a line, take your pencil off the paper before you draw the next line.
Lesson 3
- Using a sharp pencil, practice drawing squares and rectangles for five minutes.
- Squares and rectangles are made of four straight lines. The corners of the squares and rectangles you draw should not be curved. Each time you draw a line, take your pencil off the paper before you draw the next line.
- Make sure your paper is on a hard, flat surface. Don’t erase anything you draw.
Lesson 4
- Using a pencil, practice drawing circles for five minutes without stopping. You already know how to draw circles, but practice anyway. You can’t draw a perfect circle yet, but you will get a lot better if you keep practicing.
- Make sure your paper is on a hard, flat surface. Don’t erase anything you draw.
- You can draw circles on top of other circles, and you can draw on both sides of the paper.
- When you start drawing a circle, don’t take your pencil off the paper until you have finished. Make sure both ends of the circle meet together.
Lesson 5
- Practice drawing ovals and diamonds for five minutes. Make sure your paper is on a hard, flat surface. Don’t erase anything you draw. You can draw shapes on top of other shapes, and you can draw on both sides of the paper.
- Draw copies of this oval . When you start to draw an oval, don’t take your pencil off the paper until you are finished. Make sure both ends of the oval meet together.
- Draw copies of this diamond. Make sure that the corners of the diamonds that you draw are pointed, not curved.
Lesson 6
- An abstract drawing is a drawing that has no subject. It is just lines, shapes and colors. Read about abstract art.
- Look at these paintings. All of these paintings are abstract.
- Today, make an abstract drawing with all of the shapes you have been practicing drawing.
- First, use a black marker to draw circles on a piece of paper. If you don’t have a black marker, you can use a dark blue or purple marker or a black colored pencil. You can draw circles on top of each other. Draw big circles and little circles.
- Here’s a picture of these steps.
- Draw them carefully. Don’t trace them. If you want to, you can draw the circles with a pencil first, then trace the pencil lines with the black marker, then erase the pencil lines once the marker has dried.
- Next, draw some squares. You can draw shapes on top of each other. Don’t use a ruler to help you draw straight lines.
- Draw some triangles. Don’t use a ruler to help you draw straight lines.
- Next, draw some straight and curved lines on top of the other shapes.
- Color your drawing in with markers or crayons.
- Go tell somebody what abstract art is.
Lesson 7
- For five minutes, move your pencil around in circles on a piece of paper without taking the pencil off the paper.
- This is what the paper should look like when you are done.
- On a different piece of paper, create an abstract drawing by moving different colored pencils around in circles. You could also use crayons or markers. Here’s an example.
Lesson 8*
- Try to copy these different types of lines as closely as you can.
- Now copy some of these swirly lines.
- You can turn simple lines and shapes into more complicated drawings.
- *This is a drawing of an orange. Print this picture out, and then follow the steps below to draw a copy of it.
- First, look at this orange carefully to see what kinds of shapes and lines it is made of. Trace the lines and shapes with your finger.
- When you’re drawing a picture of something, it’s usually best to draw the biggest shape first. What is the biggest shape in this picture? Answer: the circle.
- Get out a piece of paper and a pencil and draw the biggest shape that you saw in the picture that you’re copying. Try to make it the same size as what you printed out.
- What are the next-biggest shapes and lines? Draw those next. What do they look like? Are they curved or straight or wavy or zigzagged? Copy the way that they look.
- The smallest shapes and lines in the picture should be drawn last of all. Before you draw them, trace them with your pencil to help you notice them better.
- When you have finished copying the orange picture, you can color it in if you want to.
Lesson 9
- Try to copy all these different types of lines as closely as you can.
Lesson 10
- Choose a few of these plants to draw copies of.
- If you have any plants available, draw a picture of one of them. If you want to, color in your drawing.
- Read about Vermeer.
- Look at some of his paintings.
- Girl With a Pearl Earring This is Vermeer’s most famous painting.
- The Geographer
- The Milkmaid
- The Astronomer
- The Art of Painting
- Go tell somebody about Vermeer.
Lesson 11*
- Print out this picture of a butterfly. On another piece of paper, draw a copy of it. Draw with a pencil so that you can erase anything that doesn’t look right.
- Before you start drawing, look at the butterfly to see what shapes and lines it is made of. Trace the shapes and lines with your finger. Then, think about which shapes you should draw first, which ones you should draw next, and which ones should come last.
- The head and the middle of the body are like circles, the end of the body is like an oval, and the wings are like triangles. The top wings are longer than the bottom wings.
- Color your drawing in when you’re finished.
- Read about cubism. Read all the way to the bottom of the page.
- Look at some of Pablo Picasso’s artwork.
- Go tell somebody what you learned about cubism. Describe to somebody one cubist painting that you saw today.
Lesson 12*
- Print out this picture of some flowers and draw a copy of it. Use a pencil so that you can erase anything that doesn’t look right to you. Try to make your drawing the same size as the picture that you printed out.
- Before you start drawing, look at the picture to see what lines and shapes the flowers, stems and leaves are made of. Trace the picture with your finger.
- What should you draw first? What will you draw next, and what will you draw last of all?
- Color the drawing in when you’re finished.
Lesson 13*
- Draw ten triangles, ten squares, and ten circles.
- Everything that you see can be drawn with simple shapes like what you just drew. No matter how complicated the thing you’re looking at is, you can always figure out how to draw it with simple shapes and lines.
- For example, this picture shows how a pear can be drawn with two circles – a small one at the top and a big one at the bottom.
- Here’s another example. This picture shows how a chick can be drawn with two circles – a small one for the head and a big one for the body.
- Print out this cat. Draw a copy of it, using a pencil. This picture might seem complicated, but can you figure out how to turn the cat’s body into simple shapes?
- Draw the cat with simple shapes and lines first, and then add the detail on afterwards.
- When you’re finished, color your drawing in (if you want to).
Lesson 14
- Choose an object in your house and draw a picture of it using a pencil. Look at it carefully before you start drawing. What shapes and lines is it made of? How can you draw it with simple shapes? Which part are you going to draw first?
- Read about Leonardo da Vinci.
- Look at some of his paintings.
- Go tell somebody what you learned about Leonardo da Vinci.
Lesson 15
- Practice drawing circles for five minutes. Draw circles that are all different sizes.
- Try to copy all of these shapes. Don’t trace anything or use a ruler to help you draw straight lines.
- An octagon has eight straight sides. A pentagon has five straight sides. A hexagon has six straight sides.
Lesson 16
- Try to copy this drawing of a rose as accurately as you can. (Here’s an alternative picture.) First, draw an oval to show where you will draw the rose part at the top. Draw lightly with a pencil so that you can erase it easily.
- Then, draw a diagonal line to show where you will draw the stem. The stem does not go straight up.
- Next, draw some ovals showing where you will draw the leaves.
- Start drawing the rose part inside the oval you drew first. Draw one petal at a time.
- Draw the stem after you have finished drawing the rose part, and then draw the leaves.
- Don’t color this drawing in yet. Keep it safe, because you are going to color it in later.
Lesson 17
- Color your drawing of a rose in with crayons or colored pencils.
- Here are some photos of roses you can look at to decide what colors to use.
- one The lighter parts on this rose are yellow and the shadows are more orange.
- two The lighter parts on this rose are red and the shadows are purple and black.
- three The lightest parts on this rose are white. Most of the rose is pink. Some of the shadows are red and some of the shadows are almost blue.
- If some parts of the rose you are drawing are white, be careful not to color them in.
- Don’t use just one kind of green for the leaves. Use several different kinds of green together. Also, use some brown, blue, and yellow. This will help you make the leaves more realistic.
- Sign your name on your drawing when you’re finished. Maybe this drawing can be a present for your mom.
- Look at these other drawings of roses.
- rose with bow The person who drew this rose used brown, yellow, and blue in the leaves, not just green.
- red rose
- pink rose
- Create an abstract drawing. You can use crayons, markers, colored pencils, pens, and ordinary pencils. Before you start drawing, look at these abstract paintings for ideas. Don’t copy any of them, though. Draw your own picture.
Lesson 19
- Draw a picture of the bird in this photograph. Before you start drawing, look carefully at the bird to see what kinds of shapes and lines it is made of. How can you draw this bird using simple shapes?
- Read about abstract art.
- Use crayons to make a copy of this abstract painting.
- Read about Vincent Van Gogh and look at some of his paintings.
- What do you think is special about Vincent Van Gogh’s paintings? Go tell somebody.
- Choose one of the paintings above and make a copy of it using crayons or paint.
- To make your drawings look 3D, you need to shade them. Shading is when you darken some parts of your drawing with your pencil.
- This is a circle that is not shaded.
- Here is the example picture. It has all the following examples as well.
- This is a circle that is shaded.
- You are going to make a shading chart today. Draw a long rectangle on a piece of paper, like this. Don’t use a ruler.
- Draw lines inside the rectangle to divide it into smaller boxes.
- Start shading the first box. The first box will be the darkest one. Every box after that will be a little bit lighter, and the last box will be the lightest one. You can make darker shades by pressing down hard with your pencil. Make the first box as dark as you can.
- Shade the second box. Make it a little bit lighter than the first box.
- Shade the rest of the boxes. Make each box a little bit lighter than the one before it. You can make lighter shades by not pressing down much with your pencil. You can leave the last box white.
- Move your pencil back and forth on a piece of paper, pressing down as gently as you can. Keep pressing down harder and harder as you go on, until you can’t make it any darker.
- Keep on practicing this until your shading looks like this example.
- Try to draw a circle that is almost perfect.
- Choose one of these shaded drawings and copy it as accurately as you can.
- A painting or drawing of land is called a landscape. Choose one of these drawings and copy it as accurately as you can. All of these drawings are landscapes.
- Go tell somebody what a landscape is.
- Read about John Singer Sargent.
- Look at some of his paintings.
- Go tell somebody about John Singer Sargent’s paintings. What do you think makes them special?
- Choose a landscape and copy it as accurately as you can. Be careful not to let your hand smear the drawing.
- Realistic art tries to copy what is seen in real life.
- Look at these realistic pencil drawings.
- Go tell somebody what realistic art is.
- Practice drawing circles for five minutes.
- This drawing is of a sphere. A circle becomes a sphere when you shade it.
- Here are some more examples of spheres.
- Look at the next drawing of a sphere. This page has the following examples as well.
- The lightest part on the sphere is called the highlight. The highlight is actually a reflection of the light that is shining on the sphere.
- The part of the sphere that is between the darkest part and the lightest part is called the middletone.
- The darkest part on the sphere is called the core shadow.
- The shadow that the sphere makes on the table is called the cast shadow.
- Light is reflecting off the table and onto the bottom of the sphere. This light is called reflected light.
- Some of the reflected light on the sphere is reflecting back off the sphere into the shadow. This is called double-reflected light.
- Look for the highlight, middletone, core shadow, reflected light, cast shadow, and double-reflected light in this photograph.
- Go explain to somebody what you learned today.
- Practice drawing circles for five minutes.
- The shapes and locations of shadows change depending on where the light is coming from. Look at the cast shadows in each of these photographs.
- Look at these two pictures of spheres.
- In the first picture, the edges of the cast shadow seemed to blend into the table. The cast shadow was hard to see.
- In the second picture, the edges of the cast shadow were clear and easy to see.
- If the edges seem to blend in to the table, they are called soft edges. If the edges are clear and easy to see, they are called sharp edges.
- If a bright light is coming from only one source, the edges of the cast shadow will be sharp. If light is coming from more than one source or is dim, the edges of the cast shadow will usually be soft.
- Go explain to somebody everything that you learned today.
- Try to draw three almost perfect circles.
- It is important to draw and paint what you actually see, not what you think things should look like.
- Sometimes you will see colors that might not make sense, like blue on a banana. Light can reflect off one object and on to another object. This reflected light can make colors look different.
- In this photo, light coming from the windows is reflecting off the green paper and on to the face. This reflected light makes half of his face look green.
- This page has all the photo examples.
- In this photo, light is reflecting off the blue blanket and on to the bottom of his face.
- In this photo, light is reflecting off the blue blanket and on to the stuffed animal.
- The light reflecting off the green paper in this photo makes one side of the lemon look green.
- The light is reflecting off the sides of the orange bowl and on to the lemon. This makes the lemon look orange.
- In this photo, the light reflecting off the green paper makes some parts of the egg and the hand look green.
- The light reflecting off the green paper in this photo is making some of the white cloth green.
- This is a white flower that I put into some different colored measuring cups.
- The light reflecting off the sides of this cup makes the flower look pink. There is also some reflected pink light in the shadow the cup makes.
- Colored light is reflecting off these cups and on to the flower and the shadow.
- Look for the reflected light in these paintings.
- Walk around your house and look for reflected light.
- Go explain to somebody what you learned today.
- In a landscape, the things that are far away usually look lighter than things that are nearby. This is called atmospheric perspective.
- You can see atmospheric perspective in this photograph.
- You can show atmospheric perspective in your landscape drawings by shading things that are far away more lightly than things that are nearby.
- Choose one of these landscape photographs and draw a picture of it. Shade your drawing.
- Go tell somebody what atmospheric perspective is.
- Today you are going to draw a sphere. A circle turns into a sphere when you shade it.
- First, draw a big circle in the middle of your paper. You can trace the circle if you want to.
- Next, draw the outline of a cast shadow, like this. The shadow is shaped like an oval.
- Start shading the sphere lightly. Shade with curved lines, because the sphere is round.
- Be careful not to press down too hard with the pencil or smear the drawing with your hand. Keep the lines you draw as close together as you can. Example
- Continue shading with curved lines. Make the shading darker as you get closer to the bottom of the sphere.
- Finish shading the sphere. There is a light area at the bottom of the sphere because light is reflecting off the table that the sphere is sitting on and on to the sphere.
- With the corner of an eraser, draw a line along the bottom of the sphere to make it lighter.
- Start shading the shadow close to the sphere. Make it as dark as you can next to the sphere.
- Finish shading the shadow. Use straight lines because the tabletop is flat.
- The part of the shadow that is closer to the sphere is a little bit lighter than the part of the shadow that is farther away from it. This is because of double-reflected light.
- This is a drawing of a cylinder. Copy this drawing. Here are some more examples of cylinders. cans Christmas candles metal tubes birthday cake
- Look at these realistic colored pencil drawings. They really are drawings, not photographs. If you keep practicing, you can learn to draw pictures that are as realistic as these.
- This is drawing of a cone. Copy this drawing. Here are some more examples of cones. party hat light
- Look at these realistic paintings. None of these pictures are photographs.
- onions
- grapes and plums
- Ruddy Taveras
- woman’s face Yes, this really is a painting, not a photograph.
- Find a cube, a cylinder, a cone, and a sphere. Set them up on a table in front of you. They should be a little bit below your eyes so that you can see them easily. If you can’t find a cone, you can twist a piece of paper into a cone and tape it in place. Example
- If you can’t find these objects, draw from this photograph. You don’t need to draw the background.
- With a sharp pencil, draw your setup. Draw the outlines of the shadows that the shapes make on the table, so that the shapes you draw will not look like they are floating in the air. Be careful not to make the drawing too small or too big. Example
- Make sure you drew everything correctly. The shapes need to look the right size compared to each other. The bottoms of the cylinder and the cone are curved, not straight.
- Don’t start shading yet. You will shade later. Save your drawing, and keep the shapes you are drawing safe.
- Put all the shapes you were drawing earlier back in the same place they were before. Turn them and move them around until they look the same as your drawing.
- Start shading the shapes to make them look 3D. Use straight lines to shade the cube. The sphere, cylinder and cone are curved, so shade them with curved lines. The table that the shapes are on is flat, so use straight lines to shade the shadows that the shapes make on the table.
- Today you are going to draw a picture of this painting.
- First, carefully fold a piece of paper in half, like this. Example (and examples for the following)
- Open the paper and cut it in half along the folded line.
- Choose the half that looks best to draw on.
- Start by drawing a small line on the center of the left side of the paper, like this. This will divide the paper in half.
- Next, draw two more small lines, one above the first line and one below it, like this. This will divide the paper into four quarters.
- Make the line closest to the bottom of the paper longer. This is the lake.
- Begin drawing the mountain on the other side of the lake. Start drawing the top of the mountain at the line closest to the top of the paper.
- Continue drawing the mountain.
- Finish drawing the mountains on the other side of the lake. The lines you draw should be darker on the left side of the paper and lighter when you are drawing the mountains that are harder to see.
- Next, draw a short line on the middle of the bottom of your paper. This will divide the paper in half.
- Draw another short line in between the left side of the paper and the line in the middle of the paper.
- This will divide the left half of the paper into two quarters.
- Start drawing the ground close to you at the short line closest to the left side of the paper.
- Draw the trees and the mountain on the right side of the picture.
- Draw the reflections in the lake.
- Draw the clouds.
- Read about Albert Bierstadt. He painted the picture that you drew today.
- Look at some more of his landscape paintings.
- Go tell somebody about Albert Bierstadt.
- Look out a window and draw what you see. Then color your drawing in with paint, crayons, or anything else that you want to use.
- Try to copy this landscape as accurately as you can.
- A painting or drawing of the sea is called a seascape. Choose one of these drawings and copy it as accurately as you can. All of these drawings are seascapes.
- Go tell somebody what a seascape is.
- A painting or drawing of an object or an arrangement of objects is called a still life. It is called a still life because these objects do not move.
- Look at the paintings below. These paintings are all still lifes.
- Today you are going to draw an apple. This drawing will be a still life.
- Set an apple on a table in front of you. The apple should be a little bit below your eyes, so you can see it clearly. If there is a sticker on the apple, take it off. Make sure there is enough light in the room you are drawing in. Example pictures
- If you don’t have an apple at home, draw from this photograph.
- With a sharp pencil, draw the outline of the apple. Don’t press down too hard with your pencil. An apple is shaped a little bit like a sphere. You should make your drawing about the same size as the real apple.
- Next, draw the stem, if the apple you are drawing has one.
- After that, draw the leaf, if the apple you are drawing has a leaf attached to the stem.
- Next, look for lighter colors on your apple. Draw the outlines of the lighter colors. Be careful not to press down too hard with your pencil.
- Look for darker colors on the apple. Draw outlines showing where the darker areas are.
- Highlights are bright reflections on an object. If you can see any highlights on your apple, draw their outlines next.
- Last of all, draw the outline of the cast shadow.
- Keep this drawing safe, because you are going to shade it later. Make sure nobody eats the apple you are drawing!
Lesson 45
- Put the apple you drew earlier back in the same place it was before. Turn and move it around it until it looks the same as your drawing.
- Sit down in the same place you were sitting in before. Make sure light is shining on the apple from the same direction it was coming from before.
- Examples
- Start shading your drawing. An apple is like a sphere, so the lines you use to shade the apple should be curved in the direction the apple is curved.
- Your shading should be dark in the darkest places on the apple and light in the lightest places. The apple I drew was mostly red, but there was some yellow around the stem. Yellow is a lighter color than red, so I didn’t shade as much in the yellow area as I did in the red area.
- Be careful not to smear the drawing with your hand. If you want to rest your hand on the drawing, put a different piece of paper in between your hand and your drawing so that your hand will not touch your drawing.
- Next, shade the highlights, if there are any on your apple. There are two highlights on my apple because there were two windows in the room I was drawing in.
- Highlights are not usually completely white. They might be a little blue, if the light is coming from a window and the sky outside is blue. If the highlights on your apple are not pure white, they need to be shaded a little bit.
- Here is an up-close photo of the shading in my highlights. The top one is a little bit lighter than the bottom one.
- Look carefully at the apple you are drawing to see if there are any reflections on it from the table or anything else in the room. If there are, make sure you include them in your drawing.
- The apple I drew was on a white table, and some light from the window reflected off the table and on to the apple. That is why there is a white spot at the bottom of my apple and another white spot on the right side of my apple near the top.
- Next, shade the stem and the leaf, if the apple you are drawing has them.
- Look at your apple carefully to see if there are any tiny dots on it. If the dots on your apple are lighter than the rest of your apple, use an eraser to make dots in your drawing. If the dots on your apple are darker than the rest of your apple, use your pencil to draw the dots.
- Finally, shade the cast shadow your apple makes on the table. You need to do this so that your apple will not look like it is floating in the air. The table is flat, so the lines you use to shade the shadow should be straight, not curved.
- In this drawing, the edge of the shadow is soft and there is a lighter shadow on each side of the dark shadow. This is because there was more than one light in the room I was drawing in.
- When your drawing is finished, sign your name on it.
- Go tell somebody what a still life is.
- Look at these other drawings of apples.
- Today you are going to draw a pear. This drawing will be a still life.
- Set a pear on a table in front of you. The pear should be below your eyes so that you can see it easily. Make sure the room you are drawing in has enough light.
- Here are the examples.
- If you don’t have a pear at home, draw from this photograph.
- A pear is made of two spheres, a big one at the bottom and a little one at the top. With a sharp pencil, lightly draw two circles on your paper to show the top and bottom of the pear.
- Next, draw the outline of the pear, using the circles to guide you. If your pear has a stem, draw it. If your pear has a leaf attached to its stem, draw the leaf.
- Carefully erase the circles without erasing the outline of the pear.
- Draw the cast shadow that the pear makes on the table.
- Keep this drawing safe, because you are going to shade it later. Make sure nobody eats the pear you are drawing.
Lesson 47
- Put the pear you are drawing back in the same place it was in before. Turn it until it looks the same as your drawing.
- Sit down in the same place you were sitting in before. Make sure light is shining on the pear from the same direction it was coming from before.
- Start shading your drawing. The pear I was drawing was covered in tiny bumps, so I shaded most of the pear by moving my pencil in little circles. Shading that way made the pear in my drawing look bumpy.
- If the pear you are drawing is bumpy, you can show the bumps by shading with little circles.
- If the pear you are drawing is smooth, you don’t need to shade with little circles. You can shade it like you shaded the apple. Remember that a pear is made of two spheres. Shade it with curved lines.
- Here is a close-up photo showing the way that the pear was being shaded.
- Continue shading the pear. I shaded smoother parts of the pear with long, curved lines. In some parts I shaded with lines first and then shaded on top of the lines with small circles.
- I shaded with larger circles to show larger bumps and smaller circles to show smaller bumps.
- There is a light area along the bottom of the pear because the pear is on a white table and light is reflecting off the table and onto the pear. Look carefully at the pear you are drawing to see if there are any reflections or highlights on it. If you see any, make sure you include them in your drawing.
- If the pear you are drawing has a stem or a leaf, shade them now.
- The pear I was drawing had some scratches and small dark dots on it. Look carefully at the pear you are drawing to see if there are any tiny dots or scratches on it.
- If they are lighter than the rest of the pear around them, carefully draw them on using the corner of an eraser. If they are darker than the rest of the pear around them, draw them on with your pencil. If there are no scratches or dots on the pear you are drawing, skip this step.
- When you are finished shading the pear, start shading the cast shadow that the pear makes on the table. Use straight lines because the table is flat.
- Look carefully at the edge of the shadow to see if it is soft or sharp. Also, see if some areas of the shadow are darker than others.
- Sign your name on your drawing when you’re finished.
- Look at these other drawings of pears.
- Explain to somebody how you shaded your pear.
- Draw a still life with a pencil. There should only be one object in your still life. Make your drawing as realistic as you can.
- If you don’t know what to draw, here are some ideas.
-
- a flower
- a fruit or vegetable
- a spoon or fork or knife
- a leaf
- a rock
- a toy
- a shoe
- a piece of bread
- glasses
- a magnifying glass
- scissors
- a frying pan
- an egg
- a piece of cloth
- a crayon or pencil
- a flashlight
- a piece of trash
- a sock
- a lit candle
- some spilled water
-
- Shade your drawing. Sign your name on your drawing when you’re finished.
- Copy one of these drawings of cars.
- Draw a picture of one of these paintings. You don’t need to shade your drawing.
- Draw a picture of a vase. Keep checking your drawing to make sure it is accurate. You don’t have to shade your drawing, but you can if you want to.
- If you don’t have a vase at home, draw from one of these photographs.
- Draw a picture of a cup or a mug. Don’t use a glass one. Use one with sides that you can’t see through. Keep checking your drawing to make sure it is accurate. You don’t have to shade your drawing, but you can if you want to.
- If you can’t find a cup or a mug, draw from one of these photographs.
- Choose one of these photos of flowers and draw a picture of it. Make your drawing as accurate as you can.
- Shade your drawing as accurately as you can.
- Sign your name on your drawing when you’re finished.
- Draw a picture of a stuffed animal. Make sure your drawing is not too big or too small. If you can’t find a stuffed animal to draw, then draw from one of these photos. Make your drawing as realistic as possible.
- Check your drawing to make sure it is accurate. Then, color your drawing in. If the stuffed animal you are drawing is fluffy, maybe you can show that by moving your crayons around in little circles while you color.
- Sign your name on your drawing when you’re finished.
- Read about Rembrandt. You don’t need to read the timeline.
- Look at some of his paintings.
- Portrait of a Man Sharpening a Pen
- The Framer Herman Doomer
- A Polish Nobleman
- Marten Looten
- The Anatomy Lesson of Dr Tulp
- The Night Watch
- The Rich Man from the Parable
- Judas Repentent, Returning the Pieces of Silver
- The Feast of Belshazzar: The Writing on the Wall
- St. Joseph’s Dream
- Aristotle with a Bust of Homer
- Self Portrait in Oriental Attire
- Self Portrait
- An Old Woman at Prayer
- An Officer
- Go tell somebody about Rembrandt.
- Draw any picture that you want to, using any materials that you want to.
- Read about Caravaggio.
- Look at some of his paintings. Choose a favorite one and draw a copy of it.
- Go tell somebody about Caravaggio.
- Draw a picture of someone in your family. Do this while they are being still, so that you can observe them carefully. Some good times to draw pictures of people are when they are sleeping, working on the computer, reading a book, or watching TV.
- Look in the mirror and draw a picture of your own face. Color your drawing in with crayons.
- Find a coin and put it on a table. Put a piece of paper over the coin. Hold it still and shade the area where the coin is with a pencil. A picture of the coin will appear on the paper.
- Today you are going to draw a landscape and shade it while other textured objects are under your paper.
- Choose one of these pictures to draw.
- If the picture you chose is a different shape than your piece of paper, cut your paper to make it the same shape as the picture.
- When your paper is the right shape, draw the outlines of everything in your landscape.
- When you are finished drawing, look around your house for flat surfaces with interesting textures. Some things you might want to use are wood, cardboard, concrete, tiles, and carpets.
- Choose one of the surfaces you found and put your paper on it. Shade the sky first, if there is sky in the picture you chose. I chose to use this wood for the sky because the texture it created on the paper looked like the clouds in the picture.
- Next, put your paper on a different surface and shade a different part of your drawing. I used smooth cardboard for this moon.
- Now, put your paper on a different textured surface and shade another part of your drawing.
- Put your paper on a different surface and shade another part of your drawing.
- Put your paper on a different surface and finish shading your drawing.
- Sign your name on your drawing when you’re finished.
- Draw a still life. There should be two or three objects in your still life. Choose objects with complicated and interesting shapes. You don’t need to shade your drawing, but you can if you want to. Sign your name on the drawing when you’re finished.
- If you aren’t sure what to draw, look at these other still lifes for ideas. Don’t copy any of these drawings, though.
- Copy this drawing of a banana. It’s okay if your copy doesn’t look exactly the same as this drawing; just try to make it look similar.
- Read about Joseph Wright.
- Look at some of his paintings.
- sea cave
- Alchemist
- An Iron Forge
- Dovedale by Moonlight
- Mrs. Robert Gwillym
- Fleetwood Hesketh
- Mrs. Frances Hesketh
- Portrait of the Honorable Mrs. Boyle
- Matlock Tor by Moonlight
- An Experiment on a Bird in an Air Pump This is his most famous painting. Click on it to see it up close.
- Go tell somebody about Joseph Wright.
- Copy this drawing of a bee.
- When a circle is viewed from the side, it is called an ellipse. If you look down at a cup from above it, the top is a circle. But if you look at a cup from the side, the top is an ellipse.
- An ellipse is shaped like an oval. This is an ellipse. Look at the ellipses in these photos.
- Choose three of these photos and draw the ellipses in them. You don’t need to draw everything in the photos, just the ellipses.
Lesson 65
- Draw a picture of something shiny. Shade your drawing. Be careful to draw what you really see, not what you think it should look like.
- If you don’t know what to draw, here are some ideas.
- a metal spoon, fork or knife
- a Christmas ornament
- a metal pot or pan
- a glass of water with sun shining on it
- aluminum foil
- a drop of water on a table, with sun shining on it
- Copy one of these abstract drawings. Use crayons, colored pencils, markers or anything else that you want to.
- Draw a picture of your hand with a pencil. You don’t need to shade your drawing.
- Set up a cup, a fruit or vegetable, and a book on a table.
- Make sure they are below your eyes.
- If you can’t find these things, use different objects instead.
- Lightly draw the outlines of the objects. Draw what you actually see, not what you think it should look like.
- Check your drawing to make sure you drew everything correctly and the objects look the right size compared to each other.
- If you made any mistakes, erase them and try again.
- Save this drawing, because you are going to shade it later.
- Make sure nobody eats the fruit or vegetable you are drawing.
- Put the cup, fruit or vegetable, and book you were drawing back in the same place they were before.
- Move them around until they look the same as your drawing. Sit down in the same place you were sitting in before. Make sure light is coming from the same direction it was coming from before.
- Shade your drawing. Don’t draw dark lines around the objects if you don’t actually see them there.
- Sign your name on the drawing when you’re finished.
- Here’s an example.
Lesson 70
- Today you’re going to draw pictures without looking at your paper! The only things you will look at are the objects you are drawing. This is called blind contour drawing.
- First, choose something to draw. It can be your hand, a plant, a shoe, a person, or anything else you want. You can’t draw from your imagination. Draw something from real life.
- Get a pencil and a piece of paper, and sit down in front of the object that you chose. Look at the object, and draw a picture of it without looking at your paper or your hand at all. Once you start drawing, don’t lift up your pencil until the drawing is finished. Draw the whole picture with one line.
- Your picture won’t look very realistic, but blind contour drawing improves your ability to draw what you see. The more times you practice this, the better your drawings will become.
- Now choose a second object to draw. Draw it the same way as you drew the first picture. Don’t stop looking at the object until you are finished drawing it. Don’t look at your paper or your hand until you are finished drawing. Don’t take your pencil off your paper until you are finished.
Lesson 71
- Read about how to create a random abstract drawing. Create both of the drawings that this article tells you how to make.
- You can draw them in black and white or in color.
- You can use markers, crayons, pencils or anything else that you want to use.
- Set up a still life on a table in your house. There must be between five and seven objects in your still life. Look for objects that have different shapes, sizes and textures. There must be one large object and one very small object in your still life setup. Make sure there is enough light in the room.
- Draw your still life with a sharp pencil. Make sure that all of the objects in your drawing are the right shape and size compared to each other. Draw quickly, and don’t worry too much about making your drawing look perfect. Don’t use a ruler to help you draw straight lines, and don’t trace anything.
- Think about the whole space, not just the objects in your setup. If you see other objects in the room around your still life setup, and there is room to include them in your drawing, then draw them.
- Just draw the outlines of the objects and the outlines of the cast shadows. Do not shade your drawing. Sign your name when you’re finished.
- Look at these drawings. phones room random items ship and bottle
- Find a small toy in your house and draw a picture of it. Try to draw it the same size as it is in real life. Draw as accurately as you can. Shade your drawing.
- If you can’t find a toy to draw, then draw from one of these photographs.
- Look at this drawing of a bottle of wine, a toy octopus, an apple and a bunch of grapes.
- Use a pencil or a pen to create an abstract drawing that is all about different types of lines. The drawing should be detailed and complicated.
- Include lines that are thin, thick, dark, light, steady, shaky, curved, and straight. You can use a ruler to make straight lines.
- Some of the lines should seem to fade away into the paper, and some should have clearly visible ending points. Make lines that are darker in some places and lighter in other places.
- Look at these abstract drawings made of lines for ideas, but don’t copy any of them.
- Use a pencil to draw a picture of your foot. You can sit down on a couch with your paper on your lap and stick your leg out in front of you so you can see your foot well. Your foot should be bare in the drawing. Don’t shade your drawing.
- Look at this amazing landscape drawing!
- Draw or paint a picture of anything you want to, using something unusual that you’ve never made a picture with before. For example, instead of drawing with a pencil, you could draw a picture using colored yarn and glue the yarn onto the paper. Or, you could paint with mud. Or, you could glue small rocks or pieces of candy onto a piece of cardboard to make a picture. Or, you could draw a picture using colored tape. Or, your could make your own paintbrushes. Look at these pictures for more ideas before you begin to make your picture.
- These paintbrushes were homemade using plants and string.
- This picture is made of jellybeans.
- three This portrait is made of plastic bottle caps.
- This 3D abstract drawing is made of tape.
Lesson 77
- Perspective is a way to make things in a drawing seem like they are 3D or far away even though they are really drawn on a flat piece of paper.
- Today you are going to draw a picture of a box using a kind of perspective that is called one point perspective.
- First, use a ruler and a pencil to draw a straight line across the middle of the paper, like this. Draw lightly so that you can erase your lines later. This line is called the horizon line. Write horizon line next to this line.
- Draw a rectangle on one side of the paper, below the horizon line, like this. This rectangle is the front of the box.
- Draw a dot somewhere on the horizon line. This dot is called the vanishing point. Write vanishing point next to the dot.
- Use a ruler to draw four straight lines connecting the corners of the rectangle to the vanishing point, like this.
- Next, make a second rectangle behind the first rectangle by drawing four straight lines connecting the four other lines together, like this.
- Erase the horizon line, the vanishing point, and the lines outside of the box.
- Right now the box is transparent. You can see the inside of the box. Erase all the lines inside the box that you wouldn’t be able to see if the box was not transparent.
- You drew a box in one point perspective!
Lesson 78
- One point perspective is called one point perspective because there is only one vanishing point. On Lesson 79 you will draw a box in two-point perspective, with two vanishing points.
- Look at these other drawings of boxes in one-point perspective.
- The horizon line is the line in between the land or sea and the sky. Look at the horizon line in this picture. Here is another picture showing a horizon line.
- The vanishing point is the point on the horizon line where the other lines go towards. It is called the vanishing point because the lines seem to disappear after they reach it.
- Go explain to somebody what the terms horizon line and vanishing point mean.
- Today you’re going to draw a box using two point perspective. The directions might sound confusing, but you can just copy the pictures. Start by using a pencil and a ruler to draw a horizontal line across the middle of your paper. This is the horizon line. Next, draw two dots on the horizon line. These are the vanishing points.
- Use a ruler to draw a short, straight vertical line somewhere below the horizon line, in between the two vanishing points.
- Now, use a ruler to draw four straight lines connecting the top and bottom of your line to the vanishing points, like this.
- Draw two more vertical lines, one on each side of your first vertical line, connecting the last lines that you drew, like in this example.
- Use your ruler to draw two more lines, connecting the tops of the lines you drew to the vanishing points on the opposite sides, like in this example.
- Now, erase the horizon line and all lines that are outside of the box.
- You drew a box in two point perspective!
- Watch this video that shows how to draw a cityscape in one point perspective. Follow the directions to draw the same picture as you see in the video. Color your drawing in if you want to.
- Which one of these paintings shows atmospheric perspective?
- In a realistic drawing of these cherries, should the highlights be shaded or not? Explain to somebody why.
- Watch this video that shows how to draw stairs in two point perspective. Follow the directions to draw the same picture as you see in the video.
- Look out a window near you and draw what you see outside. Don’t shade your drawing.
- To draw a picture of this scene, should you use one-point perspective or two-point perspective? Tell somebody your answer.
- Today you get to use watercolor paints! You’re only going to paint with one color today. If you have black watercolor paint, use that. If you don’t have black, use dark blue.
- It’s best to use thick paper for watercolor, but you can use ordinary paper. If you don’t have any thick paper, put three pieces of ordinary paper on top of each other on a table. The extra pieces of paper are to soak up some of the water.
- Next, fill a cup with water and set it on the table next to your paper. Get out your paintbrush. Get out some napkins or paper towels and put them next to your paper.
- Next, get out your watercolor paints. Is your watercolor paint in tubes, or is it in a pan? This is what it looks like in pan form.
- If you have pan watercolors, begin by dipping your paintbrush into the water and gently moving it in circles around your black or dark blue paint to get the paint wet. Don’t damage the brush by pressing down hard. When the paint is wet, wash your brush by dipping it into the water again and then wiping it gently on a paper towel.
- If your watercolor paint is in tubes, find a plastic plate or another piece of plastic that you can use as a palette. A palette is what artists mix their paints on. It’s best if you have a white palette. Squeeze a tiny drop of black or dark blue paint onto your palette.
- With your pencil and ruler, draw this on your paper. See the example.
- Do you remember when you practiced shading these squares with pencil before? Now you’re going to practice shading with watercolor paint.
- Paint the first square as dark as you can. Continue painting each square lighter and lighter. Make the last square as light as you can. To mix a dark shade of paint, use only a tiny bit of water. To mix a light shade of paint, use a lot of water and very little paint.
- If a box that you have painted is too light, you can wait for it to dry and then paint over it with a second layer of paint.
- Try to copy this watercolor painting of a flower. You don’t need to use a separate piece of paper, you can just paint it next to your squares. Notice how some tiny drops of paint are splattered around the flowers. You can splatter paint by getting some paint on your brush, holding the brush above your paper, and then flicking the hair on the brush back and forth with your finger or your pencil.
- Do you remember when you drew an apple with pencil in some earlier lessons? Now you’re going to paint one using black watercolor paint. Put away the piece of paper that you used for the shading practice and the flower, and get out a new piece of paper for this painting. Go get an apple and set it on the table in front of you. Make sure there is enough light in the room. Use some other kind of fruit or vegetable if you don’t have an apple.
- Use a pencil to draw the apple, and then shade your drawing using black watercolor paint. Add more water to your black paint to make gray. Don’t use white paint for white areas; just leave white areas blank.
- When you are finished painting, wash your brush in clean water and wipe it gently on a paper towel or napkin. If you made a mess with your paint, clean it up.
- Look at this abstract black, gray and white watercolor painting.
- Red, yellow and blue are called primary colors. All colors in the world are made of a mixture of red, yellow and blue. You can’t make red, yellow or blue by mixing other colors together.
- Green, purple and orange are called secondary colors. A secondary color is made by mixing two primary colors. Look at this color mixing chart.
- Go tell somebody what primary and secondary colors are.
- You’re going to paint with watercolors again today. Set up your painting supplies in the same way that you did on Lesson 84. Today you’re going to paint with three colors: red, yellow and blue. You’re going to practice mixing these colors to create green, orange and purple.
- Watch this video. As you watch, paint what you see being painted in the video. You’re going to paint a color wheel. Stop watching this video when you get to 9:20.
- Next, watch this video and follow the directions to copy the painting that you see in this video. Put away your color wheel and copy this painting on a separate piece of paper.
- Quickly and gently brush water over the whole piece of paper before you begin painting, like the artist does in the video. Then try to paint quickly before the water dries. You’re going to paint this picture using only red, yellow, and blue paint.
- Don’t be upset if your painting doesn’t turn out well. It takes a lot of practice to learn to paint well with watercolors. Don’t forget to clean up your work area and wash your brushes when you’re done painting.
Lesson 86
- Yellow-green, yellow, yellow-orange, orange, red-orange, red, and red-purple are called warm colors. Warm colors are colors associated with things that are warm.
- Green, blue-green, blue, blue-purple, and purple are called cool colors. Cool colors are colors associated with things that are cold.
- Half of the colors on this wheel are warm and half are cool.
- This photo shows warm colors. This photo shows cool colors.
- Go tell somebody what warm and cool colors are.
- Today you’re going to make two abstract watercolor paintings.
- Get all of your painting supplies ready. Today, you’re going to paint with all the colors you have. In the first painting you will use warm colors, and you’ll use cool colors in the second painting. Your first painting will look similar to this.
- Begin your first painting by dipping your brush into water and drawing a large circle with the water in the middle of your paper. Dip your brush into water again and fill the whole circle with water.
- Next, get lots of red paint on your brush. Drop the red paint from your brush into your circle of water, like in the video. Swirl the paint around a little bit with your brush. Next, wash your brush.
- Do the same thing again with yellow paint, and then with all the other warm colors.
- Finally, sprinkle a little bit of salt on your painting and set your painting aside to dry. After your painting is completely dry, brush the salt off and it will leave little white dots on your painting that look like stars. You can use a marker to sign your name on your painting when you’re finished.
- Now you’re going to make another abstract watercolor painting on a separate piece of paper. Remember, you’re going to use cool colors for this painting.
- The painting will be like water. First, look at these photos of water, and mix some colors on your palette that are the same colors you see in the water.
- Example pictures for this lesson
- Next, paint lines on the paper that look like the lines you see in the different photos of water. Try to show that the water is moving.
- Now splash some water drops onto your painting. Pick up some paint with your brush and drop it into the water splashes. Keep the paper flat. Wait until the water is dry before you move on to the next step.
- Next, tape the paper onto a wall, or hang it up on a refrigerator with magnets. Splash a few more drops of water onto the drawing, and then splash some paint on and let the water run down the paper. Clean up any water or paint that drips off the paper. Leave the paper there until the water is dry.
- Use a blue, green, or purple marker to sign your name on the drawing when you’re finished.
- Here’s another abstract painting with warm colors.
- Look at this color wheel. Two colors that are opposite of each other on the color wheel are called complementary colors.
- Red and green are complementary colors. Blue and orange are complementary colors. Yellow and purple are complementary colors.
- When a pair of complementary colors are put next to each other, they make each other appear brighter. That’s because complementary colors are the opposites of each other.
- In every pair of complementary colors, one color is cool and one color is warm. In red and green, red is warm and green is cool. In yellow and purple, yellow is warm and purple is cool.
- In blue and orange, do you know which color is warm and which color is cool? Tell somebody.
- Today you’re going to use watercolor paints to do some experiments with complementary colors. Get your painting supplies ready! Today you’re going to paint using only the three primary colors.
- First, use a pencil to draw three rectangles on your paper. Next, draw a line down the middle of each rectangle to divide all of the rectangles in half so that you have six squares.
- Next, paint the first half of one rectangle red. The two primary colors that you haven’t used yet for this rectangle are yellow and blue. Mix the two colors that you haven’t used yet together. Paint the second square with the color that you mixed. The color that you mixed is the complement of red.
- Next, paint the first half of another rectangle yellow. What are the other two primary colors that you haven’t used yet for this rectangle? Mix them together to make the compliment of yellow. Paint the second half of the rectangle with the color you mixed.
- Now, paint the first half of the last rectangle blue. What are the other two primary colors that you haven’t used yet for this rectangle? Mix them together to make the compliment of blue. Paint the second half of the rectangle with the color you mixed.
- Example
- A canvas is a strong, thick, rough, light-colored piece of cloth that is stretched over a wooden frame, attached to it with staples, and covered with a kind of white glue called gesso. When artists paint with oil paints, they usually paint on canvas. You can paint on canvas with acrylic paint too, but not with watercolor paint.
- Watch this video of an artist creating an abstract painting. He has put 16 canvases onto the floor so that they make one giant square. He sprays water and paint across the canvases and mixes the paint together a little bit in some places using a giant paintbrush that is taller than him.
- Today you will paint with watercolor paints again. Get your painting supplies ready.
- Black, brown, white, and gray are called neutral colors. You’re going to make an abstract painting with neutral colors today.
- You can make gray by mixing black and white together. But when you’re using watercolor paints, that’s not how you make gray. With watercolor paints, you make gray by mixing a lot of water with some black paint to make a very light shade.
- Mix three different shades of gray, and paint some lines or shapes on your paper using the shades of gray that you mixed.
- You can make brown by mixing all three primary colors together. Try to make brown paint this way, and paint a brown shape or line on your paper. If your brown looks gray, add more yellow and red to the mixture until it looks right. If your brown looks purple, add more yellow to the mixture until it looks right.
- Another way to make brown is by mixing two complimentary colors together. Mix some red and green paint together and paint a shape on your paper with the color you mixed. Then do the same thing with yellow and purple paint, and with blue and orange paint. If the colors you mix look gray, add more of the warm color until they look right.
- Neutral colors can be warm or cool too.
- Here are warm grays and cool grays.
- Here is a warm brown.
- Here are some different shades of brown. Find one warm brown and one cool brown.
- Make some brown paint by mixing the three primary colors together. Divide the paint that you mixed into three parts. Mix some extra blue into one part. Then mix some extra yellow into the next part, and then mix some extra red into the last part.
- Paint three shapes on your paper using the three kinds of brown that you just mixed.
- Now, mix together some of the brown that had extra yellow and some of the brown that had extra blue. Paint a shape on your paper using the color that you just mixed.
- Mix together some of the brown that had extra yellow and some of the brown that had extra red. Paint a shape on your paper using the color that you just mixed.
- Another way of making gray is to mix lots of different colors together until you have a muddy-looking gray color. Do you have a color like that on your palette? Do any of the browns that you mixed look like that?
- How many different kinds of brown and gray do you have on your paper by now? Show your abstract painting to somebody and tell them how you mixed each kind. Also, show them which kinds are warm and which kinds are cool.
- Does your painting look similar to this?
- Copy this painting. Match the colors as accurately as you can. You don’t need to copy the letters at the top.
- Look at the squares in your painting where two colors overlap. What colors are they? Which ones are darkest? Which ones are brighter than others and which ones are grayer than others?
- Go tell somebody what the complement of blue is.
- Watch this video showing how to paint a rose. While you watch, paint a rose in the same way that he does. Your rose won’t look exactly the same as his, because watercolor paint flows around in different directions, and you don’t have the same materials as him. Try to copy his rose as accurately as you are able to, though.
- Go tell somebody what you should do if you are trying to make brown paint by mixing the three primary colors together but the brown looks too purple.
- If you are mixing brown paint and the brown looks too green, you should add more red.
- Do you know what color you should add more of if the brown paint that you are mixing looks too orange? Tell somebody.
- Watch this video showing how to paint a seascape. As you watch, try to copy what the artist does in the video, to make your own painting. You don’t have to use the same kind of paper or the same kind of brushes as the artist does, though. You don’t even have to use exactly the same colors.
- First, draw the scene with a pencil. Then, gently brush clean water over the whole sky. While the sky is still wet, brush colors into the sky.
- When the sky is completely dry, paint the waves. Observe the techniques the artist uses to do this.
- Next, paint the sandy beach. Then, add smaller details to your painting until you are satisfied that it is finished.
- Watch this video showing how to paint a simple tree. As you watch, copy the painting as accurately as you can.
- Look at this watercolor landscape.
- Go tell somebody what the complement of purple is.
Lesson 93
- Set up a still life on a table in your house. There should be between three and five objects in your still life. Choose objects that are not too large or too small. Don’t choose objects that have many small details on them. Make sure there is enough light in the room.
- Use a pencil to quickly draw the outlines of the objects in your still life setup. Then paint them. Don’t use any white paint. Just leave white areas blank. Use a small, thin brush or a colored pencil to sign your name on your painting when you’re finished.
- Look at this cool drawing. The outlines of the objects were drawn, then some circles were drawn on the picture, and the space inside the circles was colored in.
- Look at these watercolor still lifes.
- Watch this time-lapse video showing an artist painting a starry night sky. As you watch, copy the painting as accurately as you can. Watch for a few seconds at a time, then pause the video and copy what the artist did, then watch for a few more seconds, then pause the video and paint some more.
- Find one object in your home that is a warm gray and one object that is a cool gray.
- Today you’re going to start working on a realistic watercolor still life. You will have until Lesson 98 to finish it. You can copy one of these watercolor paintings, or you can take a photo of something in your house and copy your photo.
- pear still life
- salt and pepper still life
- candy still life
- flower still life
- marble still life Notice all the different shades of gray, green, blue, and purple in this painting.
- Once you have chosen a picture to copy, choose a piece of paper to paint on. You can use ordinary printer paper, but if you have some thick paper, you should use that instead. If you are going to copy one of these five paintings, begin by cutting your paper so that it is the same shape as the painting you are going to copy.
- Once your paper is ready, carefully draw the picture that you are going to paint. Draw very lightly, but make sure that you can see the lines. Use a sharp pencil. Do NOT shade your drawing. You should try to finish the drawing today, but you don’t need to.
- Don’t start painting until Lesson 96.
- Continue working on the still life that you started on Lesson 95. If you haven’t finished drawing yet, make sure you finish today.
- When you’re finished drawing, start painting. If you’re copying a painting, try to copy it as accurately as you can. If you’re copying a photo, try to make your painting realistic, but you can change things a little bit to make the painting more beautiful.
- Continue working on your watercolor still life. You should finish by Lesson 98.
- Finish your watercolor still life.
- Now you’re going to draw a picture of your hand in one minute. Get out a piece of paper, and get a pen or pencil to draw with. Use this timer. To set the timer, click on one and then click on zero twice. Then click “Set.” When you’re ready to start drawing, click “Start.” Begin drawing a picture of your hand. Try to draw as quickly as you can. When the timer rings, stop drawing, even if you’re not finished.
- Look at all of these drawings. All of these drawings were done with crayons. Have you ever seen crayon drawings as good as these?
- Today you’re going to draw a picture of a dog using only a black crayon. Watch this video. As you watch, try to copy the drawing as accurately as you can. Sign your name on your drawing when you’re finished.
- Draw a still life with a pencil and then color it in with crayons. There should only be one object in your still life. Make your drawing as realistic as possible.
- Here are some coloring tips:
- Try to keep the points on your crayons sharp.
- Color carefully and deliberately. Don’t scribble!
- Color evenly. Don’t leave white areas between your lines.
- Color very lightly at first, then color the same place over and over again, pressing a little bit harder each time, until the color is as dark as you want it to be.
- You can mix colors together by layering them on top of each other.
- Leave white areas white. Don’t color them in with white crayons.
- If there are small light-colored lines or details in your still life, you can color over them and then scratch them out with a toothpick or a pin.
- If you don’t know what to draw, here are some ideas:
- a crayon
- a flashlight
- a flower
- a fruit or vegetable
- a spoon or fork or knife
- a leaf
- a rock
- a toy
- a shoe
- a piece of bread
- glasses
- a magnifying glass
- scissors
- a frying pan
- an egg
- a piece of cloth
- Sign your name on your drawing when you’re finished.
- Watch this video showing how to paint a cherry tree by splattering drops of paint on the paper. While you watch, copy the painting as accurately as you can.
- Read about impressionism.
- Read some more about impressionism.
- Look at all of these examples of impressionist drawings and paintings.
- Monet was a famous Impressionist. Today you are going to start copying one of his paintings using crayons instead of paint. Choose one of these three paintings by Monet to copy.
- If the painting that you chose is a different shape than your paper, cut your paper to make it the right shape. Then, use a light-colored crayon to draw the picture onto your paper.
- Start coloring in your picture. Try to copy the colors in your painting as accurately as you can. Use one color of crayon at a time and color wherever you see that color in the painting.
- Try to color using short marks like you see in the paintings. Try to copy the shape and size of the marks that you see in the paintings. You have until Lesson 104 to finish this picture.
- Continue working on your impressionist drawing with crayons.
- Today you’re going to start drawing a landscape with crayons in an impressionist style. You will draw half of it today and the rest of it on Lesson 106. Start by choosing one of these photos to copy. Or, if you have another photo that you want to use instead, you can do that.
- Use a light-colored crayon to draw the outlines of everything in the picture. Then, start coloring in the picture using an impressionist style. You could color using dots, or small scribbles, or short lines.
- Finish coloring in the landscape that you started on Lesson 105.
- Today you’re going to create a drawing that tells a story! First, think of your favorite story, or think of a Bible story, or write a short story yourself.
- Next, divide a piece of paper into different sections. Then, draw a different scene from the story in each section of the paper. Make sure you draw the scenes in order so that the story makes sense.
- Show your drawing to somebody and use it to tell them the story.
- Today you’re going to draw a still life of a leaf, stick, or stone. If you can, find a leaf, stick, or stone to draw from life. If you can’t find any of these things, choose one of these photos to draw from.
- Draw your still life and shade it using either an ordinary pencil or colored pencils.
- You can blend pencil lines together by rubbing them gently with your finger or a napkin or a paper towel.
- This is what pencil lines look like before being blended.
- This is what pencil lines look like after being rubbed gently with a paper towel.
- Get out a piece of paper and experiment with blending pencil. Be careful not to damage the paper. It’s usually best not to use your finger for blending, because your finger can smudge your drawing easily.
- Divide the other side of your paper into four sections.
- Try to copy each of these four different textures with your pencil. Use one section of the paper for each texture you are drawing.
- wood Try shading lightly with the side of your pencil first, and then drawing the darker lines with the point of your pencil.
- metal Blend the pencil lines when you are shading this to make it look smoother.
- glass Blend the pencil lines when you are shading this to make it look smoother.
- stone Shade this mostly with the side of your pencil to show that it is rough. Don’t blend the pencil lines together.
Lesson 110
- Find a smooth metal or glass object, such as a marble, teapot, or glass bowl. Set it on a table in front of you and draw a realistic picture of it using a pencil. Shade your drawing. Because the surface of the object is smooth, shade your drawing by gently blending the pencil lines together using your finger or a napkin.
- Watch this video showing how to draw a realistic eye. As you watch, follow the steps and copy the eye in the video as closely as you can. It’s okay if your pencil lines aren’t as dark as the lines in the video.
- Try to copy this drawing of an eye.
- Watch this video showing how to draw a mouth.
- Try to copy this drawing of a mouth.
- Watch this video showing how to draw an ear.
- Try to copy this drawing of an ear. You don’t use the blending technique to shade this drawing.
- Watch this video showing how to draw hair.
- Draw the hair in this photograph.
- Read the directions for how to draw an adult female face.
- Follow the directions to draw a picture of the woman in this photo. You don’t need to shade your drawing.
- A picture of a person’s face is called a portrait. Look at this pencil portrait, this colored pencil portrait, this marker portrait, this crayon portrait, and this watercolor portrait.
- Watch this video showing how to draw using a grid.
- Print out this photo of an eye or find a photo of an eye in a magazine. Draw a picture of the eye using a grid. You will shade your drawing on Lesson 118.
- Shade your drawing of an eye from Lesson 117.
- Take a photo of somebody’s face and print out the photo. The photo that you print out should be large. Start drawing a picture of the person’s face using a grid. You will finish drawing on Lesson 119.
- Finish drawing the outlines in the portrait that you started on Lesson 119. It’s okay if they don’t look perfect. Color your portrait in with crayons or shade it with pencil. Try to finish your portrait today if you can. If you can’t, finish it tomorrow.
- Draw a picture of your foot. If you are wearing socks, take them off first. You don’t need to shade or color in your drawing.
- Look in the mirror and draw your face with a pencil, crayon or marker. You don’t need to shade your drawing or color it in.
- Drawings and paintings that show scenes from books are called illustrations. Today you are going to start working on illustrating a Bible story. You will have eight more days to finish the illustrations.
- First, choose a Bible story from this list.
- After you have chosen a story, read it and think about how many illustrations you will create for it. You have to create at least three different illustrations for your story. You should not create more than seven illustrations.
- You should probably create about one illustration for every two paragraphs in the story you chose.
- Think about what you will show in your illustrations, what the illustrations will look like, and what materials you will use to create the illustrations. You can use whatever materials you want to.
- Now that you know what you will draw, you need to do some research about the way people lived when the events in the Bible story you chose happened. This will help you to create more accurate illustrations. You can use websites or books or both.
- Keep thinking about what your illustrations will look like. Look at some of these illustrations for ideas.
- Quickly draw some small pictures to show your ideas for the illustrations. Your drawings don’t have to look nice, they just need to help you plan what your illustrations will look like. It’s okay if your illustrations don’t turn out the same way that you planned them.
- Search online for photos to help you draw your illustrations. For example, if you are going to draw a picture of a man, you will need to find a photo of a man to copy from.
- You can combine many different photos together in your illustrations. For example, you could draw a person’s face from one photo, his clothes from another photo, and the background from a third photo.
- Start working on your first illustration today.
- Continue working on your illustrations.
- Continue working on your illustrations.
- Continue working on your illustrations. You should be at least halfway finished with your illustrations by now.
- If your illustrations are not finished yet, continue working on them. If you already finished your illustrations, draw a picture of somebody in your family instead. Try to draw the person while he or she is sitting still and doing something like watching TV or working on the computer.
- If your illustrations are not finished yet, continue working on them. If you already finished your illustrations, you can draw or paint a picture of anything that you want to.
- Chiaroscuro means the contrast between light and dark. Caravaggio used chiaroscuro in his paintings. So did Georges de La Tour.
- Read about Georges de La Tour.
- Look at some of his paintings.
- Go tell somebody about Georges de La Tour’s paintings.
- If your illustrations are not finished yet, continue working on them. If you already finished your illustrations, draw a small picture of one of Georges de La Tour’s paintings and shade your drawing or color it in with crayons.
Lesson 130
- If your illustrations are not finished yet, finish them today.
- Create a drawing that is about different textures. Here are some drawings to give you ideas. Don’t copy any of these drawings, though.
- Watch this time-lapse video of a portrait being drawn. Watch it full-screen. The artist draws the outline of the face first with an ordinary pencil and then colors the drawing in with colored pencils. She keeps a napkin under her hand while she draws so that her hand does not smear her drawing.
- If you have any sculptures in your house, choose one and draw a picture of it with pencil. If you don’t have a sculpture to draw, draw from this photo.
Lesson 132
- Watch this time-lapse video of a portrait being drawn. Watch it full-screen. The artist is drawing with colored pencils.
- Follow the directions to draw a man with pencil.
Lesson 133
- Read about these 3 basic ways to draw people. Follow the directions to draw a single person with a pencil (method 3).
Lesson 134
- Use a pencil to draw pictures of these two dancing men. Don’t shade your drawings.
Lesson 135
- Draw a picture of somebody today while he or she is being still for a long time.
- Maybe you could draw them while they’re working on the computer, watching TV, or taking a nap.
Lesson 136
- Set up a still life and paint a picture of it with watercolor.
Lesson 137
- Read about conceptual art. Sometimes conceptual art is called installation art.
- Look at these examples of conceptual art.
- Choose a favorite piece of artwork from the list above and write a sentence about why you like it. If you dislike any of the artwork you saw in this list, write a sentence about why you dislike it.
- Write a short paragraph describing the best drawing or painting that you have ever done.
Lesson 138
- Calligraphy means beautiful writing. Look at these examples of calligraphy fonts.
- Look at these Bible verses that are written in calligraphy.
- Choose a Bible verse and write it in calligraphy. You can make up your own calligraphy font or copy one. If you don’t know what Bible verse to use, write this one. You can decorate the paper around the words with pictures or designs if you want to.
Lesson 139
- Draw a design. Look at these designs for ideas, but don’t copy any of these designs.
Lesson 140
- Here is a list of ten famous artists. Choose one of these artists and read about him. On Lesson 141, you will write a paragraph about the artist you chose.
- Go tell somebody about the artist you chose.
Lesson 141
- Write a paragraph about the artist you read about on Lesson 140. Tell what country he was from, when he lived, what style he painted in, and what his most famous paintings are.
- Search online for a photo of the artist’s most famous painting.
- On Lesson 142 you will start copying the painting that you found. You can use any materials or mixture of materials that you like. Start thinking about how you will copy the painting.
Lesson 142
- Start copying the painting today. You have two more days to finish.
- If you are copying a realistic painting, you need to draw a picture of the painting with a pencil before you start painting.
Lesson 143
- Continue working on copying the painting. You have today and tomorrow to finish it.
- Try to copy the painting as accurately as you can.
Lesson 144
- Finish copying the painting today. Try to copy it as accurately as you can.
Lesson 145
- Write down or type answers to these questions about the painting you copied on Lessons 142 and 143 and 144. Use complete sentences.
- What is the title of the painting that you copied?
- How old is the painting?
- What size is the painting?
- Is it a landscape, portrait, still life, or abstract?
- What scene does the painting show? What is in the painting?
- When you look at the painting, are your eyes drawn towards a certain area? Is one part of the painting more interesting than another part? Why?
- What colors are used more than others in this painting?
- Do you feel any emotion when you look at the painting? Does it make you feel happy, or sad? Why? What mood does this painting have?
- Does the painting tell a story or send a message to people who look at it? How?
- What style was it painted in?
- How was the paint applied? Is it thick or thin? Can you see any marks from the brush on the painting, or is the paint smooth?
- What kind of paint was used?
Lesson 146
- Find two or three objects in your house that you would like to paint. Set them on a table in front of you. Get all your painting supplies ready. You are going to make three watercolor paintings.
- The first painting that you do of your still life has to be done in only five minutes. Set this countdown timer to five minutes and start painting your still life as quickly as you can. Since you don’t have much time, don’t draw outlines before you begin painting. Stop painting when your time is up, even if you aren’t finished.
- Rearrange the objects in your still life. Your second still life has to be painted in ten minutes. Set the countdown timer to ten minutes and start painting. Stop painting when your time is up, even if you aren’t finished.
- Rearrange the objects in your still life again. This time you will have fifteen minutes to paint them. Set the countdown timer to fifteen minutes and stop painting when your time is up, even if you aren’t finished.
Lesson 147
- Find three objects that you would like to draw. Set them on a table in front of you. You will have one minute to draw a picture of the objects. Set this countdown timer to one minute and start drawing as quickly as you can. Use a pencil. Stop drawing when the time is up, even if you aren’t finished.
- Now you are going to draw a second picture of your still life from memory. That means you can’t look at the objects while you draw them. You will have to remember what they look like.
- Sit down in front of the objects and look at them closely for a minute. Think about their shapes, how they are positioned, and what sizes they are compared to each other.
- Then, take a piece of paper and a pencil and go into a different room where you can’t see the objects. Draw a picture of them from memory. Whenever you need to, you can go back and look at the objects again, but you can’t draw them while you are in the room with them.
Lesson 148
- Read about how colors can represent emotions.
- Read the symbolism of color.
- Colors can make people feel different things. Get out your painting supplies and get ready to make a color chart. Use only red, yellow and blue paint, and you can mix whatever colors you want to from these three.
- Draw lines with a pencil and ruler to divide a piece of paper into six boxes. In box 1, write “angry”. In box 2, write “sad”. In box 3, write “happy”. In box 4, write “peaceful”. In box 5, write “love”. In box 6, write “hate”.
- What colors do each of these words make you think of? Paint each box with the color that you think best represents the word in that box.
Lesson 149
- Like colors, different kinds of shapes and lines can make people feel different things.
- There are many different kinds of lines: straight, curved, squiggly, jagged, thick, thin, long, short.
- Today you will make a line chart. Draw an angry line, a graceful line, a fast line, a slow line, a soft line, and a hard line.
- Here are some angry lines.
- Here are some graceful lines.
Lesson 150
- Read Galatians 5:22-23.
- Use a pencil and ruler to divide a piece of paper into ten pieces. Cut the paper along the lines so that you have ten squares of paper.
- Use a black or red marker to write. Write “love” on square 1. Write “joy” on square 2. Write “peace” on square 3. Write “patience” on square 4. Write “kindness” on square 5. Write “goodness” on square 6. Write “faithfulness” on square 7. Write “gentleness” on square 8, and write “self-control” on square 9. You don’t need to use square 10.
- In each square, draw or paint a small abstract picture that shows the colors and lines that the word in that square makes you think of.
Lesson 151
- Today you will listen to some different kinds of music and make some abstract paintings showing what the music sounds like.
- Get your art supplies ready. You will make three paintings. You can use watercolor paints, crayons, markers, or any other materials that you want to.
- Go to this website. Click on the word “Feels” near the top of the page and select “Aggressive”. Choose any song from the list. Click on the green button that says “Listen Now!” and start listening to the song you chose.
- As you listen to the song, draw and paint using colors and lines that the music makes you think of. If your song is energetic and fast, use energetic and fast lines. If your song is calm and slow, paint calmly and slowly.
- When the song is over, you can stop painting if you want to, or you can replay the song and continue painting.
- When your first painting is finished, get out a new piece of paper. Click on the word “Feels” again. Click on the word “Aggressive” and then click on “Bright”. Choose any song from the list. Click on the green button that says “Listen Now!” and start listening to the song you chose.
- As you listen to the song, draw and paint using colors and lines and shapes that the music makes you think of. When the song is over, you can stop painting if you want to, or you can replay the song and continue working on your painting.
- When your second painting is finished, get out a new piece of paper. Click on the word “Feels” again. Click on “Bright” and then click on “Calming”. Choose any song from the list. Start listening to the song. As you listen, draw and paint using colors and lines and shapes that the music makes you think of. When the song is over, you can stop painting if you want to, or you can replay the song and continue working on your painting.
Lesson 152
- Composition is how you arrange the objects that you are drawing inside of your rectangle or square shaped piece of paper so that they are pleasant and interesting to look at.
- It is almost never good to put an object directly in the center of your painting. It’s much better to put it slightly off center. If you put an object right in the center of your painting, the painting is boring to look at.
- Here’s an example of bad composition. The mugs are right in the center of the photos.
- This watercolor painting has a better composition. The pear is not in the center of the paper but it is close to the center.
- You should have variety in your compositions. Make sure that the shapes and spaces between objects are all different.
- If you put an object directly in the center of your drawing, you will have the same amount of space between the object and the edge of the paper on both sides.
- However, if you put an object off center, there will be more space on one side of the object and less space on the other side and this will make your drawing more interesting.
- Try not to make any two things the same in your compositions. For example, if you are drawing a fence, check the spaces between the fence posts in your drawing to make sure that they are all different.
- Set one object on a table in front of you. Draw four small rectangles on a piece of paper. The rectangles should be the same shape as your piece of paper; don’t make them super long.
- Draw the object inside of each rectangle. Put the object in a different position inside each rectangle. Draw quickly, and don’t add any detail to your drawings. When you’re done, decide which of your four small sketches has the best composition.
- Get another piece of paper and draw a new, larger picture of the object using the best composition from your four rectangles.
Lesson 153
- The rule of thirds is a guide to help you create a better composition. To use the rule of thirds, draw two vertical lines and two horizontal lines to divide your paper into nine equal parts, like this. There are four places where the lines connect to each other. If you put an object on one of these four places, it will create a pleasing composition.
- The house is the focal point in this painting. Notice that it has been placed on one of the four places where the lines connect.
- Here is another example of how the rule of thirds has been used to compose a drawing.
- You can balance out your composition by putting a second focal point at the opposite intersection, like in this painting. There are two focal points, the bowl of fruit and the two separate apples. The bowl of fruit is placed on the top left intersection and the separate apples are placed on the bottom right intersection.
- Set up a still life with at least three objects on the table in front of you. Draw four rectangles on one side of a piece of paper and draw four rectangles on the other side of the paper too. They should be the same shape as your piece of paper, don’t make them too long.
- Walk around your still life setup and draw different sketches of it inside of the eight small rectangles. Try to figure out the best possible composition for your still life. You can keep rearranging the objects your still life to create a better setup. Use the rule of thirds to help you find a good composition.
- After you have finished the eight sketches, choose the one that has the best composition. Get another piece of paper and draw a full-size picture of your still life setup using the same composition as your best sketch.
Lesson 154
- In good paintings, there is usually one area that grabs your attention right away when you look at the painting. This area is called the focal point. Often there is more than one focal point in a painting.
- Look at this painting by Rembrandt. What part of the painting grabbed your attention right away? Answer: Jesus’s dark head, with the light behind it.
- Why do you think that area grabbed your attention first? Answer: Because of the contrast between dark and light. The focal point has more contrast than the rest of the painting.
- Contrast is one way that you can create focal points in your drawings and paintings.
- You can create contrast by using two complementary colors next to each other, or by putting dark and light next to each other, or by using two very different textures or shapes next to each other.
- Another way to create a focal point in a painting is by separating one object from a group of objects. The one separate object becomes a focal point when you do this.
- Look at this painting. Can you see how the separate object acts as a focal point?
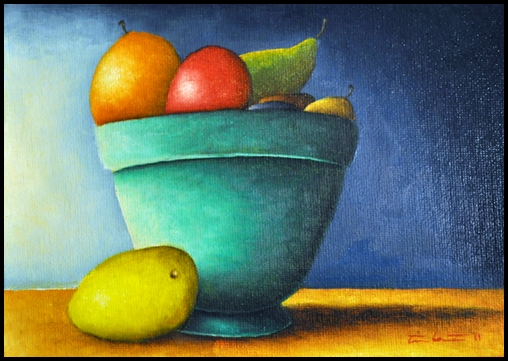
Lesson 155
- An object that is placed close to the center of a drawing or painting will become a focal point.
- It is almost never good to put a focal point right in the center of your painting. It is much better to put a focal point slightly off center, like in this painting. The focal point in this painting is the cup and it is not in the center of the painting but it is near the center.
- What is the focal point in this painting, and how did the artist make it a focal point? Answer: The woman’s blouse, headscarf and face are the focal point. The artist contrasted them with the dark background.
- Go explain to somebody everything that you’ve learned about focal points so far.
- Go explain the rule of thirds to somebody.
Lesson 156
- One way to create a focal point in a painting is to use lines to direct the viewer’s eye towards the area that you want to be your focal point.
- Examine this painting. The focal point in this painting is the woman holding the baby girl. The focal point is placed close to the center of the painting, but not exactly in the center. There are many lines in this painting that point towards the focal point. The man’s arm is pointed towards the focal point and he is looking towards the focal point. The curved side of the boat points towards the focal point. The oar and the edges of the sail point towards the focal point as well. The man is painted with dark tones, but the woman holding the baby is painted with light tones.
- Another way to create a focal point in a painting or drawing is to show the focal point in sharp focus and everything else in soft focus.
- Look at the composition of this painting. This painting has a triangular composition. The viewer’s eye is lead around the painting in a triangle, from the man’s face to the statue to the man’s hand and back to his face again.
- As soon as we look at the painting, the man’s face grabs our attention first. Our eyes are lead toward the statue next because the man’s face is pointed towards it and because his arm leads us towards it. Next, we look at the man’s hand, because the statue’s face is pointed towards it, and because our eyes follow the man’s silver sash towards it. Once we look at the man’s hand, his sleeve leads our eyes back towards his face again.
- If you divide this painting up according to the rule of thirds, the man’s head is positioned on the top right intersection.
- Go explain to somebody everything that you learned about focal points and composition today.
Lesson 157
- Look at each of these five paintings. Show somebody where the focal points are in each painting. Explain to them why your eyes are attracted to those areas. If there is nobody around for you to show the paintings to, you can write your answers down.
- Look at each of these four paintings.
- What is the feeling of each painting? Sad? Peaceful? Exciting?
- Explain to somebody what the artists did to give each painting the feeling that it has. You can write your answers down if there is nobody around.
Lesson 158
- Read about the visual elements of art: line, shape, tone, color, pattern, texture, and form.
- Look at these drawings and paintings of Jesus.
Lesson 159
- Mixed media art combines different drawing and painting materials in one picture. For example, if you paint a picture with watercolors, and then draw on top of the painting with crayons, that’s mixed media.
- You can also include other objects in your mixed media artwork. For example, you could glue string or feathers or small pieces of crumpled paper onto your picture.
- Look at these examples of mixed media art, and see if you can guess what materials were used for each picture.
- I painted this still life of an orange slice in a glass jar using mixed media. I painted with watercolor first and then drew with pastels on top of that.
- Today you’re going to start working on a portrait of yourself. This is called a self portrait. You’re going to use mixed media for your self portrait. Look at all of these mixed media portraits for ideas.
- You’re going to draw your self portrait using a grid. If you don’t remember how to draw using a grid, watch the video on Lesson 117.
- Print out a large black-and-white photo of your head and shoulders on ordinary printer paper. Carefully draw a grid on top of the photo with a ruler and a marker or pencil.
- Get out a piece of paper for your self portrait. Decide if you want to leave the paper in the shape that it is or cut it into a different shape. If you want to cut it, do that now.
- Use a sharp pencil and a ruler to lightly and carefully draw a grid on your paper. The grid can be the same size as the one on your photo, or it can be twice that size.
- Start drawing the outlines of your self portrait, one square at a time. You don’t need to draw everything that you see in the photo; just draw as much as you want to include in your self portrait.
- You don’t have to finish drawing the outlines today, but you can if you want to.
Lesson 160
- Finish drawing the outlines for your self portrait. Carefully and gently erase the grid from your paper. Fix anything about your drawing that you want to fix.
- Think about how you are going to color your self portrait in and how you want it to look when it’s finished. Think about what materials you want to use. You have to use at least three different materials to color in your self portrait. Be creative!
- Start working on coloring in your self portrait. You’ll finish on Lesson 161.
Lesson 161
- Finish coloring in your mixed media self portrait.
Lesson 162
- Draw a picture from your imagination. You can draw anything you want to.
Lesson 163
- Today you’re going to practice drawing from your memory. Choose an object to draw and set it on a table in front of you. Get out a piece of paper and a pencil.
- Look at the object carefully and draw a picture of its outline. Then keep drawing its outline over and over again until you feel very familiar with how it looks.
- Turn your paper over or get a new piece of paper, and put the object away. Now draw the outlines of the object from memory, without looking at the object or your other drawings.
- Compare your memory drawing with your other drawings.
Lesson 164
- Find a large photo of a person’s head, or print one out. Get a piece of paper and a pencil.
- Turn the photo upside down, and draw the outlines of the head and face and anything else that you see in the upside down photo. Draw everything exactly as you see it. Do not look at the photo right side up and do not turn your drawing right side up until you are finished drawing the portrait. You don’t need to shade it or color it in.
- The reason that you had to draw it upside down is that doing this will help you learn to draw exactly what you see, instead of drawing what you know that a face looks like.
Lesson 165
- You have almost finished this course, and your last project will take fifteen days to finish. You’re going to start working on it today.
- You’re going to choose a Bible story and draw or paint one giant illustration for it. Instead of using just one piece of paper, you’re going to attach sixteen pieces of paper together to make one giant piece of paper to draw on!
- Here are some illustrations of Bible stories to give you ideas. Look at all of them.
- The Raising of Lazarus
- The Baptism of the Eunuch
- Judas Repentent, Returning the Pieces of Silver
- The Feast of Belshazzar:
The Writing on the Wall - Journey of the Magi
- St. Joseph’s Dream
- Jesus preaching
- Ecce Homo
- The Nativity
- O Jerusalem
- Let Him In
- Walk With Me
- Beside Still Waters
- Cast Your Nets on the Right Side
- Baptism of Christ
- He Went Through the Villages on the Way to Jerusalem
- The Exhortation to the Apostles
- The Annunciation
- First, choose a Bible story from this list to illustrate. Click on the story you chose and read it.
- Next, look up the Bible story you chose in a real Bible and read it carefully. You can read the Bible here online if you want to.
- Next, choose one part of the story to illustrate.
- Now that you know what you are going to draw a picture of, you need to do some research so that your drawing will be more accurate. You can do research to find out things like what the houses and clothes in your drawing should look like, or what the landscape in your drawing should look like. You can use books or websites.
Lesson 166
- Think about what you want your drawing of the Bible story you chose to look like. Think of at least 3 different ways that your drawing could look like.
- You can make your drawing realistic or in any other style that you want to. Think about which style would be best for your drawing and which style you prefer.
- Think about the people or animals or objects that might be in your drawing. What are some different ways that they could look? What are some different positions that they could be in? What environment will they be in?
- Think about the composition of your drawing. How can you arrange the things that will be in your drawing to make a good composition?
- Where will the focal point in your drawing be? How will you attract attention to that area? What will the light source in your drawing be? Where will the light source be?
- If there will be people in your drawing, what emotions will they have? How can you show the emotions that they are feeling?
- What emotion would you like people to feel when they look at your drawing? How can you use light and color and other things to make them feel that emotion?
- After you have thought of three different ways that you could make your drawing look, draw a small picture of each one of your ideas. You don’t have to use a whole piece of paper for each drawing. Draw quickly, and don’t worry too much about drawing accurately. Don’t shade your drawings.
- Color your three drawings in with crayons. Use something else if you don’t have crayons. Work quickly and don’t worry too much about coloring inside the lines. Remember to think carefully about what colors you will use.
- Keep your three drawings safe. You will need them later.
Lesson 167
- Look at your three ideas for your illustration. Think carefully about which one of your ideas is the best. Choose the best idea to use for your giant illustration.
- After you have decided which idea is the best, draw a second picture of it. This drawing is to help you plan exactly how your giant illustration will look. Your second drawing of your idea should cover one whole piece of paper. This time, draw carefully and try to make your drawing as accurate as you can.
- Decide if there is anything in your first drawing of your idea that you want to change. If there is, change it in your second drawing.
- Try not to draw anything in your picture from imagination. Search online or in books for photos of people, animals, objects, or landscapes that will be in your drawing, and copy the photos. Use several different photos to copy from, not just one.
- If there are people in your drawing, you could take photos of your family members and draw pictures of them. You’ll have to draw different clothes on them, though. If there is anything in your house that you want to include in your drawing, such as bread or grapes or a piece of cloth, you can draw it from life. Take a photo of it, though, in case you aren’t able to draw it from life later.
- Don’t shade your drawing. You’ll color it in on Lesson 168.
Lesson 168
- Look at your first small drawing of your idea and decide what colors from that drawing to keep and what colors you want to change in your second drawing. Try to choose colors for your drawing that go well together and create the mood that you want.
- Color your second drawing in carefully, using crayons or watercolors or markers or anything else that you want to.
- Use a ruler and a dark marker or crayon to carefully divide your second drawing into sixteen equal rectangles, because your giant illustration will be made of sixteen pieces of paper. Number each rectangle in one corner. This is what the grid that you draw on top of your second drawing should look like.
Lesson 169
- Attach 16 pieces of paper together at the edges using clear tape or glue to make one giant piece of paper for your illustration. Hang the giant piece of paper on a wall so that the side with glue or tape is facing the wall. You shouldn’t draw on the side that has glue or tape on it. You should choose a smooth wall in a place where it’s okay if you make some mess.
- You have a giant piece of paper that is divided into sixteen rectangles, like your smaller plan of your idea. You’re drawing this illustration using a grid.
- Today, draw the outlines of everything that should be in rectangle 1 and rectangle 2 on your giant piece of paper, using your small drawing with a grid as your guide.
Lesson 170
- Today, draw the outlines of everything that should be in rectangles 3, 4, 5, 6, and 7 on your giant piece of paper, using your small drawing with a grid as your guide.
Lesson 171
- Today, draw the outlines of everything in rectangles 8, 9, 10, 11, and 12.
Lesson 172
- Draw the outlines of everything that should be in rectangles 13, 14, 15, and 16 on your giant piece of paper, using your small drawing with a grid as your guide.
- Check your illustration for mistakes and see if there is anything about your drawing that you want to fix before you start coloring it in.
- Color in rectangle 1, using your small drawing with a grid as your guide. You can use crayons, watercolors or anything else that you want to. You can color using mixed media if you want to, or use just one material. Maybe you could use watercolors for large areas of color and colored pencils for small details.
Lesson 173
- Color in rectangles 2, 3, and 4, using your small drawing with a grid as your guide.
Lesson 174
- Color in rectangles 4, 5, and 6.
Lesson 175
- Today you have a break from working on this illustration project. You can draw or paint anything that you want to today.
- Look at these amazing examples of street art.
Lesson 176
- Color in rectangles 7, 8, and 9 on your giant illustration.
Lesson 177
- Color in rectangles 10, 11, and 12.
Lesson 178
- Color in rectangles 13 and 14.
Lesson 179
- Color in rectangles 15 and 16.
Lesson 180
- Check your illustration for mistakes and see if there is anything else you want to do to improve it. When you are completely finished with your illustration, sign your name on it.
- Congratulations, you’re finished!!!